
If you’re thinking I am talking about clearing the WordPress cache, you’re most certainly right about it. For those of the readers who are new to this WordPress cache term, it simply means clearing the temporary storage of your website that is normally occupied by different forms of content. It also means that your website displays updated content every time you load any particular page.
If you have just dived into the ocean of WordPress, chances are that you might find yourself struggling with the jargon and technical delicacies of WordPress. We understand that there are many challenges that come with using WordPress. Among those challenges, we are going to address the problem that is most frequently faced by users, especially those who are just getting started with WordPress.
This blog highlights the significance of clearing your WordPress cache and how you can go about it. But before we dive right in, let us run through the significance and cost of clearing the cache.
Significance of Clearing WordPress Cache
The application of clearing the cache is most evident when you make changes to your website and need it to be displayed on your website simultaneously. What the cache does is that it stores the data content fed to it and then displays it to the user every time there’s a visitor on any particular page.
Likewise, you must always clear the cache every time you update the visual representation of your website because you wouldn’t want to display the system to fetch the previous content stored in the cache to display at the user end.
Not surprisingly, the act of continuously updating the cache also assists in troubleshooting of loading and formatting issues of websites. To wrap it up, you’d never want to not clear your cache because then the users won’t be able to experience any of the updates you make.
Required Resource for Clearing WordPress Cache
Now that you are briefly aware of what clearing the cache means, the next thing on the minds of most of you would naturally be questions like:
How much money would I need to expend in order to keep my cache cleared all the time?
Is it going to be a lot of work to do with getting rid of all the caches of my website?
or
Would I need to understand coding or dig the root files before clearing the cache?
It must be good news for those of you who don’t know yet that clearing the cache doesn’t require you to spend any considerable investment. This can be done conveniently by simply using a dedicated WordPress cache plugin.
Moreover, chances are you might not even need to use any plugins since many hosting providers offer integrated cache solutions that can be used to manage your site’s cache. In case your hosting provider does offer such a cache solution, take a look at your WordPress dashboard to find the caching tool you need.
With this let’s jump to the 5-step procedure for deleting your site’s cache.
5 Step Procedure to Clear WordPress Cache
As we discussed earlier, there are many caching solutions at the dispense of users. We, at CyberHosting, resonate with LiteSpeed Cache more. You can download the LiteSpeed Cache for WordPress Plugin to effectively store and manage our caching needs. This LSCWP wields LiteSpeed server cache for offering enhanced load time and overall optimization of the site.
read also: How To Enable Full/Advanced WordFence Protection On OpenLiteSpeed
The LiteSpeed cache plugin can be implemented in numerous offered ways in order to clear the cache. These include but are not limited to automatically purging the site’s data as a function of certain preset conditions to be met and the selective purging of custom URLs of a given website.
Following are the steps to be followed for a convenient purge:
1- First of all, you need to download and install the LiteSpeed Cache for WordPress Plugin
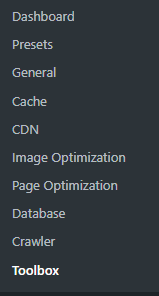
2- Go to the admin dashboard of your WordPress account and select LiteSpeed Cache
from the left panel

3- Select the Toolbox button from the drag-down menu
4- On the Purge button available, you can find different possible ways to pick from in
order to purge your website.
5- In case you need to purge the data of an entire website, select Purge All from the right
pane. This will automagically clear all your entire cache. Likewise, you can choose Purge
By button if you want to purge some selective pages of your website. This can be done
based on certain tags, categories, and URLs.
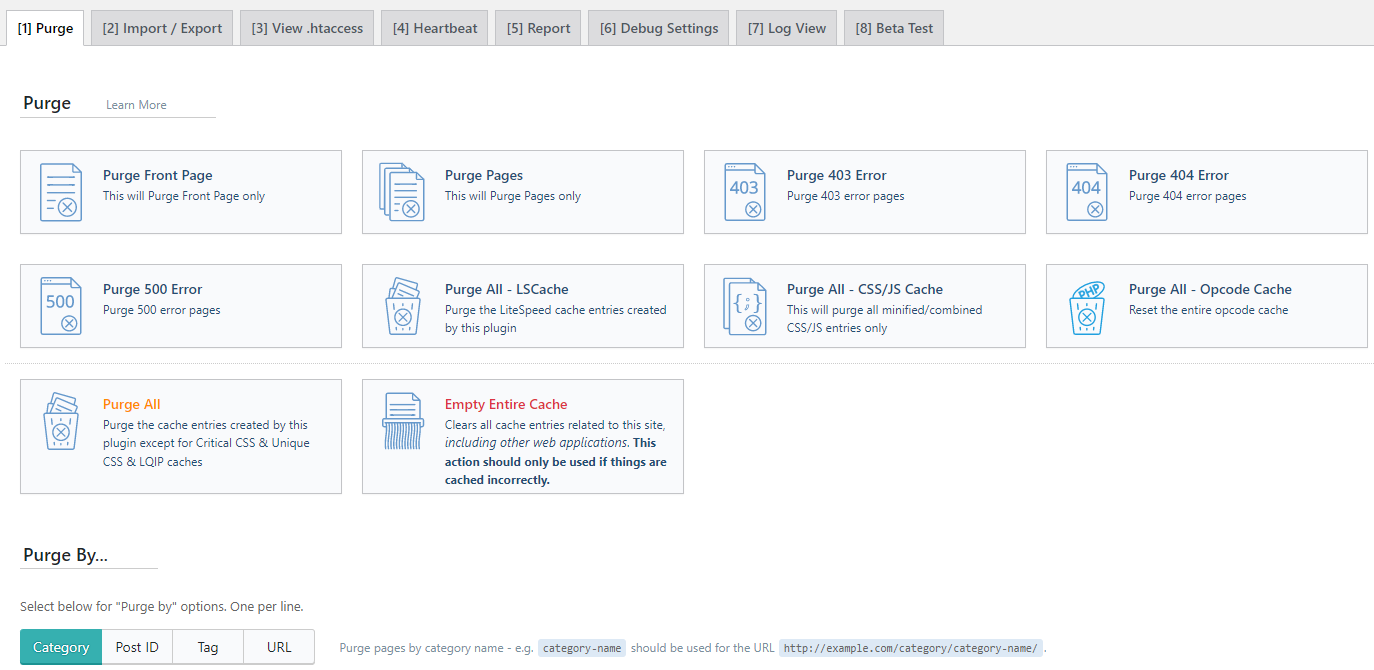
Besides this, LiteSpeed cache comes with many customized options for clearing the WordPress cache like CSS/JSS cache, Opcode cache, Purge 40x Error cache and others.