
Google Tag Manager is an incredibly powerful, free tool that does the hard work for you! Easily manage and deploy tags without having to edit your website’s code. Say goodbye to those tedious coding sessions – GTM makes it easy!
Tag Manager is a web-based wonder, used on over 44.5% of the websites globally. Its ‘plug and play’ simplicity lets you manage tags with minimal coding effort while offering superior speed from faster page loading times. You don’t have to take our word for it either – Tag Manager has an inbuilt preview mode so you can double check everything works perfectly before release!
With Google Tag Manager, you can make your digital marketing strategies even more effective! The platform has built-in tag templates perfectly integrated with tools like Google Ads and Analytics. This means managing all of your tags is as simple as logging into one dashboard – giving you ultimate control over executing positive outcomes for your campaigns.
Have you ever wanted to install Google Tag Manager on your WordPress website? In this article, we’ll cover two different methods so that you can choose the best one for your situation. Discover how quick and easy it is to get started with Google Tag Manager!
Not sure how to enable advanced tracking on your WordPress website? Check out this helpful easy guide that you can use for a simple, effective setup.
Setup Google Tag Manager Manually in WordPress
Installing Google Tag Manager in WordPress can be made easy with a simple plugin, or takes just a few minutes to do it manually – the choice is yours! Make sure you have all your tracking codes ready before taking either route.
For those who desire a higher degree of control over their code, manual methods offer the ultimate in customization compared to plug-ins. Advanced coders should strongly consider taking advantage of this increased level of personalization and power.
1. Create a GTM Account
To get started with Google Tag Manager, just follow a few simple steps. First, you’ll create an account to access all the necessary tools & features that Google Tag Manager offers and use them to your advantage. Follow the following easy steps:
- Log in to your Google account and click Start for Free on the homepage.
- Create an Account at the top right or on the icon in the center of our page. Begin discovering all that awaits.
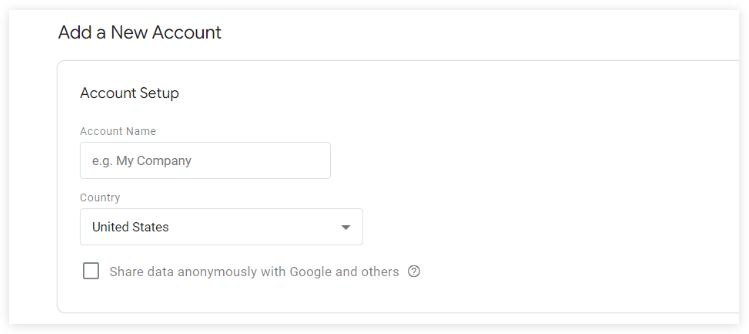
- When prompted to Account Setup, make sure to enter a customized name for recognition – we suggest incorporating the company’s brand if this is for business purposes.
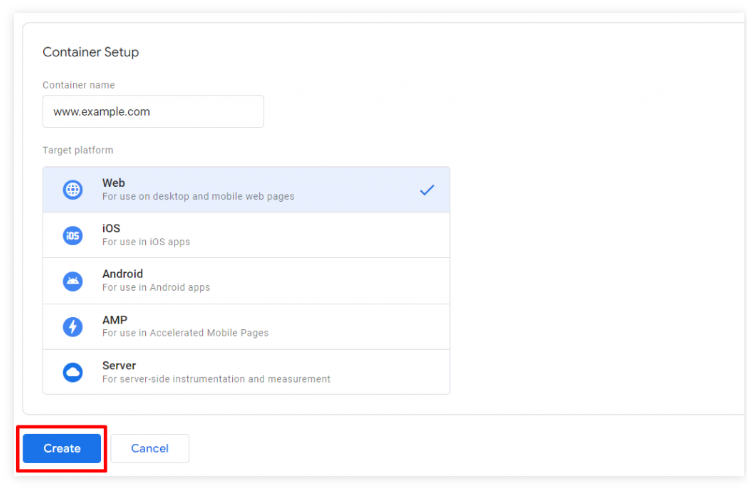
- After setting up the account, all you have to do is fill in your domain name and choose Web as the platform of choice on Container Setup. In no time, you’ll be able to enjoy the benefits of having a web presence!
- When all the necessary details have been provided, hit Create and watch your creation come to life!
- Before proceeding, you’ll need to review the information in a Terms of Service agreement window and accept its Data Processing Terms — as required by GDPR laws. Take your time so that you can make an informed decision and hit Yes to create your account.

- After these steps, you’ll need to fetch two code snippets from Google Tag Manager – one for the header and another for the body of your website. It’s easy! Just click on the copy icon next to each snippet, then paste them onto respective sections of your site. And voila! You’d be ready setup up GTM tracking in no time.

2. Integrate the Tracking Code to WordPress
Ready to add the code to your WordPress site? Follow these easy steps and you’ll be on your way!
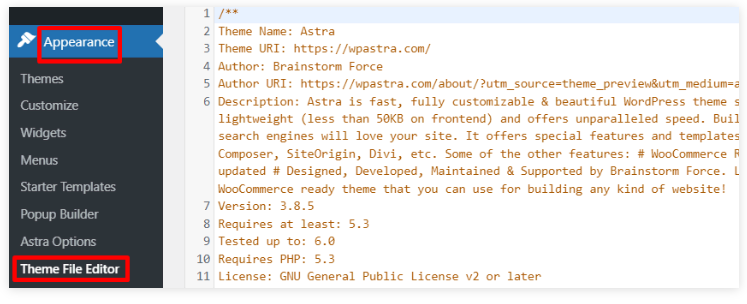
- Log in to access the Theme File Editor located in Appearance on your sidebar.
Appearance ->Theme File Editor
- Navigate the Theme Files button on the right vertical panel
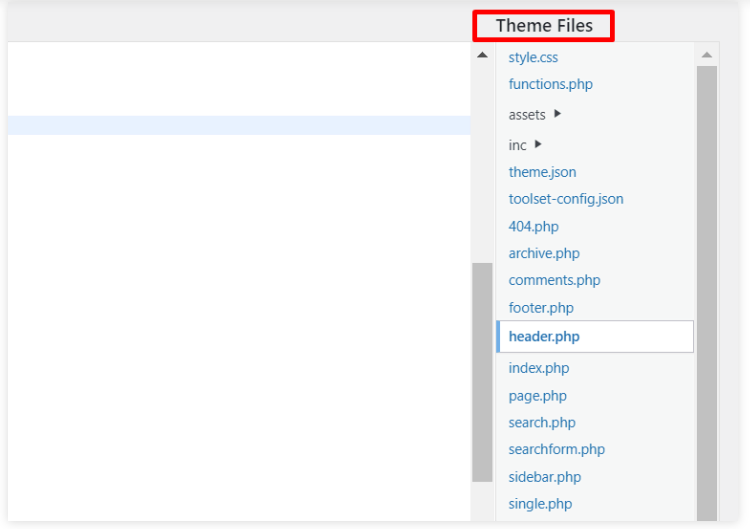
WordPress themes can give your website a unique look and feel. Every theme is composed of files that control how it looks and functions – with names such as header.php, footer.php, or even something else entirely! Knowing which file does what ensures the perfect combination of creativity and functionality for any project you take on.
To enable Google Tag Manager tracking on your WordPress website, start by looking for the header.php file in your theme’s files. If you don’t see it there, get in touch with whoever created the design – they should be able to help out!
- To customize your website header, start by copying the Google Tag Manager code. Then open up header.php and look for <head> and </head>. Note that depending on which theme you are using, the body section may be located in different template files – just keep searching until you find what works best for you.
- Ensure maximum impact by making sure the first code for your header section is placed high up in the <head> of your page.
- Add the second code snippet to your webpage’s <body> tag for greater functionality.
- Save your changes by clicking Update File at the bottom of this page.
- Once you’ve added all of your snippets to WordPress, take a moment to review them in Google Tag Manager. Click Preview and ensure that everything is working as it should.

- On the redirected page, Connect to Tag Assistant by simply entering your site URL.
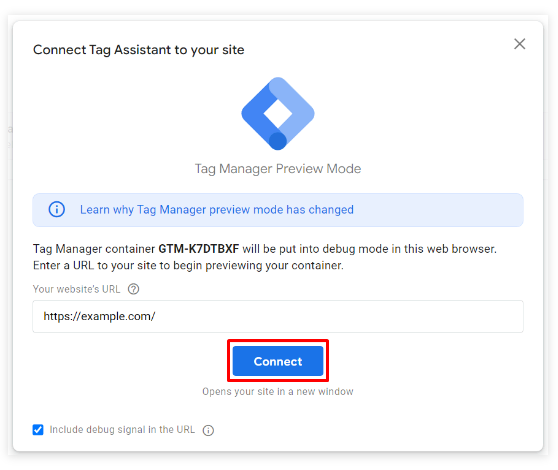
- The next window will be a prompt of successful connection of Google Tag Manager. Now hit the Finish button and carry on to Continue on the preview page.
- Congratulations! You’ve successfully installed Google Tag Manager on your WordPress website — you should now see the “Google container found” notification and your unique Container ID.
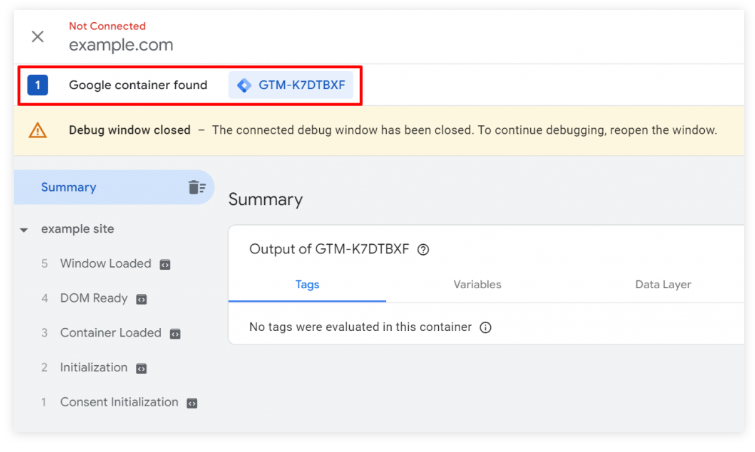
- Exit the Preview tab to finally Submit.

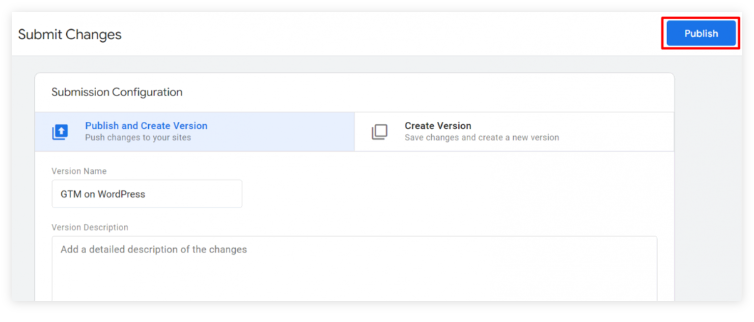
- To get your version live, enter a name – like “GTM for WP” – and hit Publish and you’ll be all done!
3. Add a Trigger and publish a New Tag
Ready to start tracking user behavior? With Google Tag Manager, you can get going quickly. Just create a tag and follow the simple steps outlined below for successful implementation!
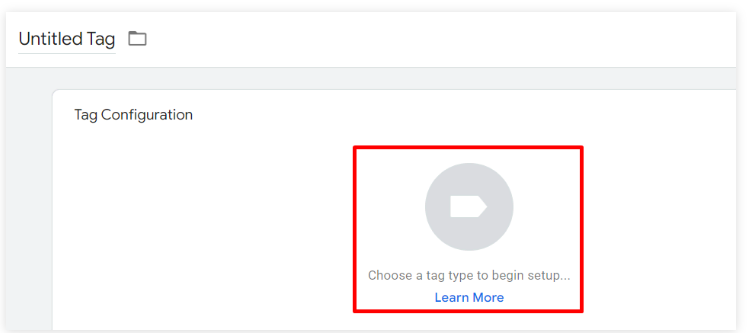
- Go to your dashboard and click Add a new tag to access multiple supported tags.
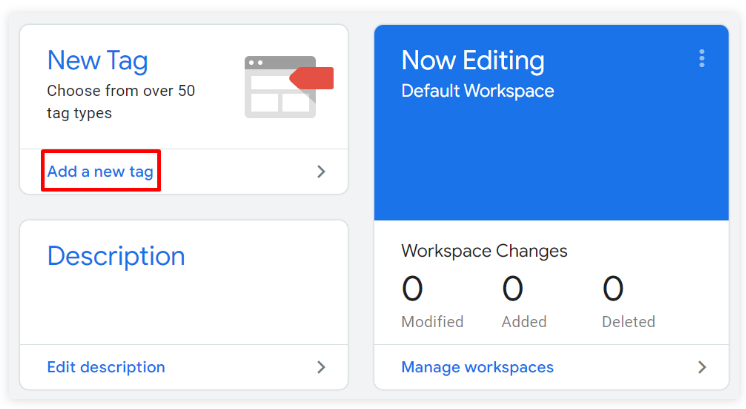
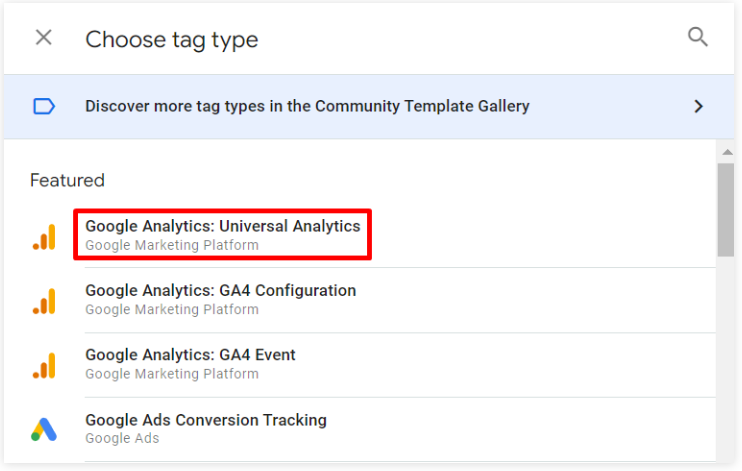
- Pick a tag type by clicking here.
- Now you’ll have access to an extensive tags list. For instance, you can pick a Universal Analytics Tag (if your site is equipped with a Google Universal Analytics Account).
- Select from the list and choose New Variable to customize your WordPress tracking experience about user behavior on your website.
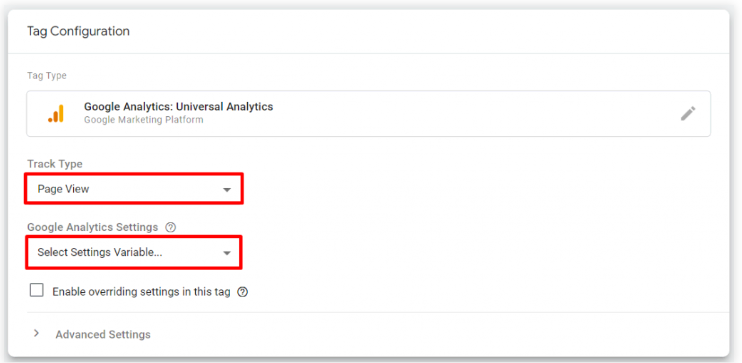
- On the next Variable Configuration tab, head over to the Admin tab in
Property -> Tracking Info. Then feed your Analytics Tracking ID into the variable field and click Save for a secure integration.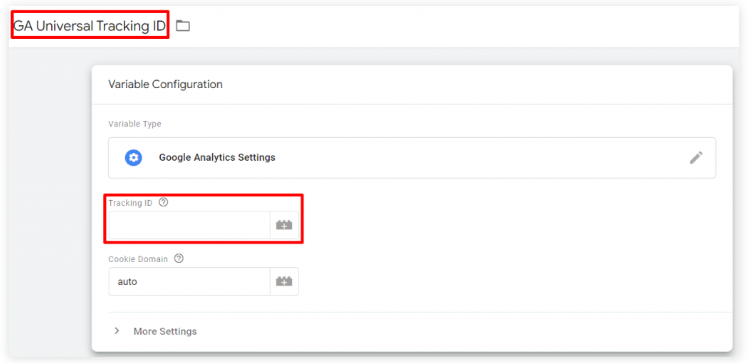
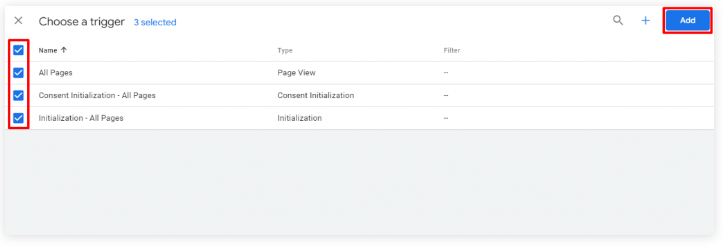
- Navigate further down to pick a trigger.
- Check all the triggers according to your needs and hit Add on the top right corner.
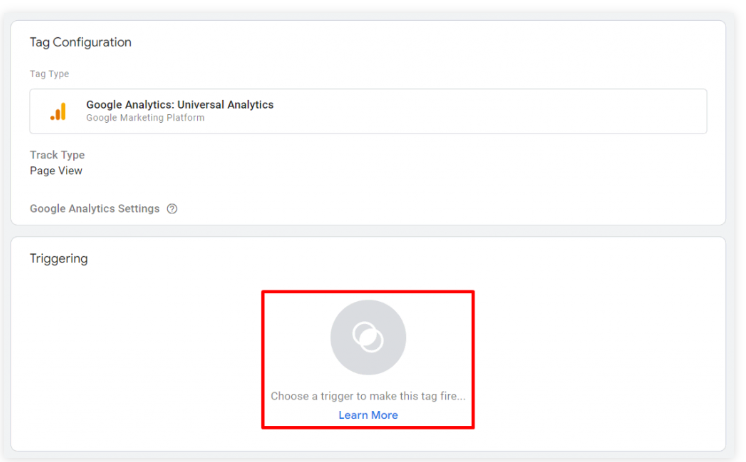
- Before making your tag public, give it a suitable name and click Save. After that, use Preview mode to make sure the tag is working correctly on the website before you publish it.
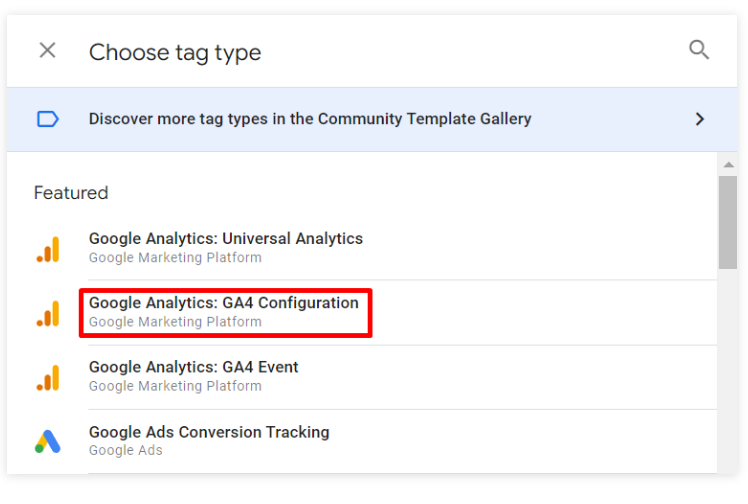
To get the most out of your Google Analytics 4 account, make sure to enable it with Google Tag Manager. Simply select the “Google Analytics: GA4 Configuration tag” and hit save – you’ll be all set.
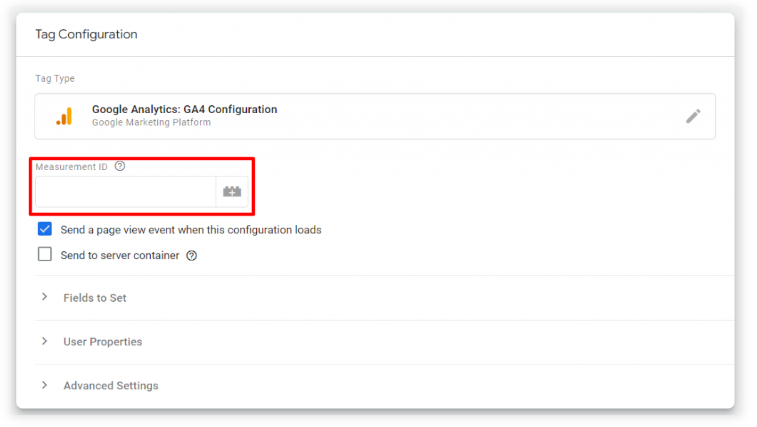
If you want to access valuable information from Google Analytics, be sure to set up a data stream on the Property tab. This will generate your unique measurement ID which needs to be entered in tag configuration – differentiating it from Universal Analytics.
Just hit Save and follow the steps we’ve outlined above for setting up a trigger for the Universal Analytics tag, and you can have everything setup in no time.
Congratulations! You have successfully completed the necessary steps to manually install Google Tag Manager onto your WordPress site – you are now ready to make use of powerful analytics from Google Analytics.
How to install Google Tag Manager on WordPress using Plugin?
If you’re just starting out with Google Tag Manager and WordPress, a plugin may be the best option for installation. It requires less technical knowledge than the manual method outlined previously, making it an ideal choice for those unfamiliar with coding or website setup.
You can begin by following the steps outlined above to create your account for Google Tag Manager.
Integrate the Tracking Code to WordPress
Now the question is where to put google tag manager code in WordPress?
Installing a WordPress plugin simplifies website development by providing an easy-to-use method of embedding code snippets without having to locate template files and manually insert them into the <head> and <body> tags.
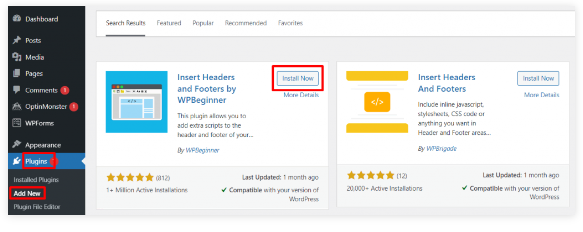
Let us guide you through installing GTM on your WordPress site using a nifty plugin known as Insert Headers and Footers.
- After you’re done creating a Google Tag Manager account, install the Insert Headers and Footer plugin by simply jumping onto your WordPress admin page. Navigate to Plugins -> Add New (just search for it) then hit Install Now.
- Next, hop on to Settings -> Insert Headers and Footers. On the configuration settings, add the code generated by Google Tag Manager.
- Paste the relevant code fragments pertaining to header and body in the dedicated spaces.

- Finally, hit Save and you’ll be done with its successful installation.
At this point, utilize the steps mentioned earlier to create a Google Analytics tag. Once you’re done, don’t forget to give it one last Preview before pushing the tag live.